In this post I am sharing how I made my own hexagon shelves for around $50. If you look for hexagon shelves on Etsy you will see that they run for about $25 per shelf. That can add up really quick depending on the number of shelves you want. I ended up finding a DIY tutorial from @living_with_kay on Instagram and was so impressed with how easy it looked! My husband was happy to help me make these when I showed him how much money we would save by making them ourselves  ” />
” />
Keep on reading to learn the steps that we followed along with my personal tips and suggestions!
Affiliate links are included in this post. If you click on these links I may receive a small commission from your purchase at no extra cost to you. Thank you for supporting my channel!

Supplies:
- 8 ft boards that are 4in deep and 1in thick (we used 4 to make 7 shelves)
- wood glue
- stainable wood filler
- sand paper
- stain (we used Early American)
- painters tape
- sawtooth hangers
- nails (not necessary, but we used a nail gun to add extra support)
Notes:
- To make a single hexagon shelf, you will need to cut six 8in boards and cut the ends at a 30 degree angle
- If you would like to add a middle shelf to the hexagon, that piece is about 14.25 inches. I recommend measuring your own shelves before cutting this piece because the diameter of each our shelves varied slightly! Cut the ends of this piece at a 30 degree angle as well.
- We glued/nailed most of the shelves together to avoid having to hang each one individually, but you don’t have to do this!
- If you attach all or some of your hexagons together, make sure the angles of the middle shelf are all in the same direction. I accidentally hung one upside down and it really triggers my OCD lol.
Steps:
- Cut the amount of boards needed for the number of shelves you plan to make (see notes section for measurements)
- Sand all of the rough edges (I recommend using an electric sander to make this process faster/easier!)
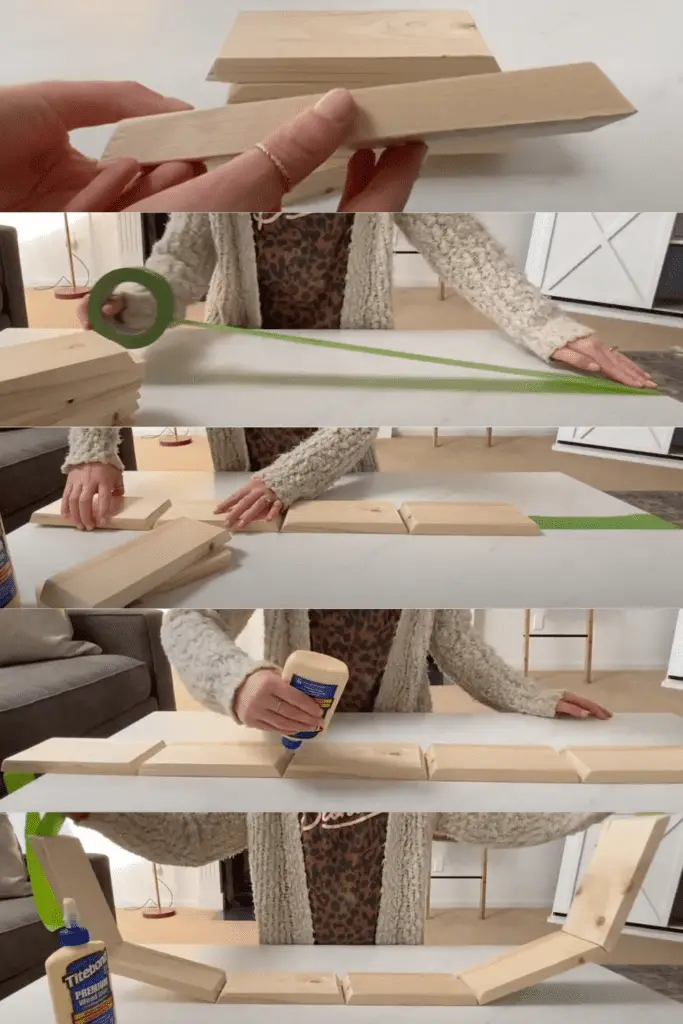
- Lay out a long piece of painters tape and line up the boards so the ends are touching
- Apply a small amount of glue in between each board
- Pull the end boards together to form the hexagon shape
- Attach the tape together to keep the boards secure
- Allow to dry for about 24 hours
- Remove tape
- Glue in the middle shelf boards (optional)
- Add supporting nails (optional)
- Apply wood filler between gaps (I only did this to the front side of each hexagon shelf)
- Let dry and sand areas that were filled with wood filler
- Stain
- Glue/nail shelves together (optional)
- Attach sawtooth hangers to back of shelves
- Hang shelves on wall (we used screws with wall anchors!)
- DECORATE! This is my favorite step 🙂
I hope you found this tutorial helpful! If you end up making these hexagon shelves send me a picture on Instagram so I can see how you decorate them!

Other posts you might like:
April 28, 2025
Last month we did Liam's baby dedication at our church! Technically they call it child Read More
February 9, 2025
In this post I am sharing all of the details on our living room playroom! Read More
August 1, 2024
This post is all about simple self care ideas to embrace the fall season!This post Read More
